


Background Eraser
4.727.61K Reviews
App Specs
- Version
- Varies with Device
- Updated On
- License
- Free
- Downloads
- 100,000,000+
- Developer
- handyCloset Inc.
- Categories
- Photography
- Platform
- Android, iOS
Screenshots
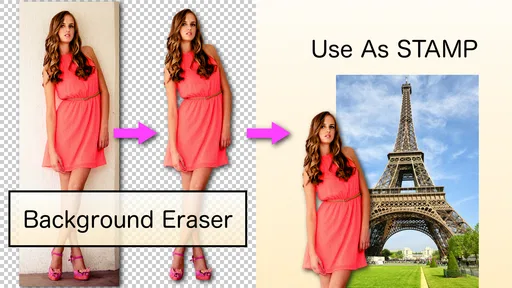
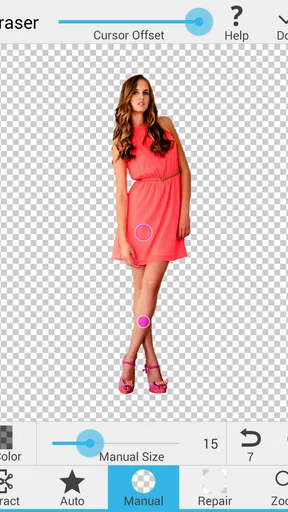
 Analysis by AppCompare
When I first open Background Eraser, I treat it as a focused cutout tool rather than a full photo editor. Its job is to help separate a subject from the scenery behind it, then leave me with an image I can reuse elsewhere. That narrower purpose makes the first attempt less intimidating: I can choose one photo, work on the edge, and see whether the result is useful without learning a large editing suite.
What to expect from a focused cutout app
This photography app is developed by handyCloset Inc. and is free to download. It has a 4.7 average from around 987 thousand ratings, with over 100 million installs, so it is clearly a familiar option for people who want to remove picture backgrounds. Its age rating is Teen. Those numbers suggest it has broad appeal, but they do not guarantee that every cutout will be clean: the photo itself still matters a lot.
The useful expectation is modest but practical. A portrait against a plain wall is usually a more approachable first project than a person standing among tree branches, loose hair, or similarly detailed scenery. I would start with a sharply defined subject and good contrast between the subject and background. If the edges are already hard to distinguish in the original photo, automatic selection has less to work with, and manual cleanup can take longer.
This is also a different kind of tool from the usual all-in-one photo editors. Those are better when I want to adjust lighting, add effects, retouch a face, and crop in one place. Here, the central task is isolation: making a subject usable on transparency or against another backdrop. That focus is helpful when I need a cutout quickly, but it means I should not expect a broad set of photo-editing controls from the experience.
From the first photo to a usable cutout
After installing it, I would choose a picture with one obvious subject and make a copy of the original first. Keeping the untouched photo gives me an easy fallback if I erase too much or decide later that a different crop would work better. I can then try the automatic approach, inspect the outline at a closer view, and use manual editing only where the result needs attention. This small, deliberate workflow is less frustrating than trying to perfect every edge in one pass.
For a first meaningful result, I would pick an everyday image such as a pet sitting against a plain floor or a product photographed on a clear table. The goal is not to make a complicated composite immediately; it is to remove the obvious surroundings and save a clean subject. If the automatic removal catches most of the background, I can correct the remaining bits with a finger. If it removes part of the subject, undoing that move and working in smaller touches is safer than repeatedly sweeping over a large area.
One detail that matters in practice is what happens around fine outlines. Hair, fur, transparent objects, and narrow gaps between limbs are much harder than a solid silhouette. I would zoom in for those areas and make small corrections instead of trusting a single broad gesture. For a profile image or a casual graphic, a slightly imperfect edge may be perfectly acceptable; for a product listing or a polished design, I would inspect the whole outline before using the result.
Worth Reading Before You Choose
EA SPORTS FC Mobile 26 Is a Bigger Football Game, but It Takes Time
Flipboard Shows What News Apps Must Do Beyond the Feed

Switching to Android Auto Means Rethinking Your Driving Routine

Google Calendar Makes a Crowded Week Easier to Manage
Ludo King Makes the Most of the Minutes Between Plans

Baby Panda World Brings Quick Play to Modern Phones, but Its Game Library Feels Busy
What works well, and where I slow down
The app’s automatic background removal is the quickest place to begin: it identifies a subject and clears away the surrounding image with a tap. I like that as a starting point, not as a promise of a flawless selection. On a busy scene, there can be leftover color or a rough contour that needs manual attention. When the subject and background share similar tones, the selection can be especially difficult to judge, so I would choose a better source photo if I have one.
Manual editing gives me more control, but it rewards patience. I work along the outline in short strokes and check the result as I go; undo is useful when a correction crosses into the subject. I would avoid trying to fix the entire perimeter in one long gesture, since one slip can erase a part I meant to keep. This is one of the practical trade-offs: automation saves time on straightforward pictures, while careful hand work gives me a way to rescue sections it misses.
Once the subject is separated, a transparent PNG is useful when I want to place it over a different design without carrying the old scenery along. A replacement background can also make the result easier to judge. I might put a simple color behind a cutout first: against a plain field, stray fragments and uneven edges are easier to spot than they are over a detailed photo. Only after the outline looks acceptable would I try a more elaborate background from my library or a gradient.
Where I would use it, and when I would choose something else
A realistic use for me would be making a quick birthday graphic from a family photo: isolate the person, check the outline, save the transparent image, and place it on a simple background. The same approach can help with a casual profile picture, a meme, or a small personal design. For product photos, the process can be useful when the object is clearly separated from its setting, though I would review the edges carefully before relying on the image for anything where a neat silhouette affects trust.
I would choose a broader editor instead if I needed detailed color correction, typography, layered composition, or a full sequence of retouching steps. A desktop editing program is a better fit when I need exact edge refinement for professional work or when the subject blends into a complicated background. The advantage here is a more direct route to a cutout; the limitation is that difficult selections can become fiddly, and a single-purpose workflow is not a replacement for a complete design workspace.
The app is most appealing to someone who wants to make occasional cutouts without first learning a complex editor. It is less suitable if every image needs studio-quality masking, if the subject has very fine details against a similarly colored background, or if I want one app to handle every part of photo production. In those cases, I would use a more capable editor or retake the image against a simpler background rather than spending too long trying to repair a poor source.
Getting Started
First things first, you can snag the Background Eraser app from both the Google Play Store and the Apple App Store. Installation is a breeze, and before you know it, you're ready to dive in and start erasing away. The interface? Super user-friendly. It’s not cluttered, so even if you’re not tech-savvy, you’ll find your way around easily.
Features That Stand Out
The app is packed with features, but let's talk about the ones that really make it shine. The standout feature has to be the automatic background removal. With just a tap, the app identifies and removes the background, leaving your subject untouched. It's like magic, but without the wand.
For those who like to have a bit more control, there's the manual mode. Here, you can use your finger to highlight the areas you want to keep or remove. It’s a bit of a learning curve, but once you get the hang of it, it’s oddly satisfying.
Why You’ll Love It
One of my favorite things about this app is that it lets you save images in PNG format. This means you can have a transparent background, which is perfect if you're into creating memes or doing some DIY graphic design. Plus, there's a handy undo button that saves you from any mishaps.
Another cool feature is the ability to add new backgrounds. You can replace the unwanted scenery with a solid color, a gradient, or even a photo from your library. The possibilities are endless, and it’s a fun way to get creative with your images.
Room for Improvement
Now, as much as I love this app, it’s not without its quirks. The automatic removal isn’t always perfect, especially with complex backgrounds. Sometimes, it leaves a little residue that you have to manually clean up. But hey, it’s a small price to pay for an otherwise stellar app.
Another thing to keep in mind is that the free version does have ads. They’re not too intrusive, but if you’re planning on using the app frequently, you might want to consider upgrading to the premium version for an ad-free experience.
Making the result look convincing
A cutout can be technically successful and still look out of place when I add it to a new scene. I pay attention to the edge and the contrast between the subject and its replacement background. If a portrait was shot in warm indoor light, for example, placing it against a stark, cool backdrop can make the mismatch more noticeable. A simple background is often the better finishing choice because it keeps the attention on the person and makes flaws easier to spot.
I also think about the intended size before spending time on tiny corrections. A small image used in a casual post may not need the same level of edge cleanup as a larger graphic. I make the cutout at the quality the final use deserves, then check it at a realistic viewing size. That keeps me from polishing details no one will see, while still catching obvious halos or missing chunks that stand out even when the image is reduced.
Saving and reusing the cutout
When I need the subject to remain separate from its background, PNG is the sensible choice because it can preserve transparency. I would avoid treating a transparent image like an ordinary photo: if it appears to have a solid background when opened elsewhere, I would check how that viewing app displays transparency before assuming the cutout has been lost. A replacement background is useful for a finished single image, while a transparent file is more flexible if I plan to position the subject in another design later.
Before sharing, I would open the saved result in the place where I actually intend to use it. A cutout can look fine inside an editor but reveal a rough edge when placed against a different color. This quick check is especially worthwhile for profile pictures, invitations, and product images, where the subject will be seen outside the editing screen. It is a simple habit that helps me catch a problem while it is still easy to fix.
A sensible first-session plan
If I were guiding a friend through a first try, I would keep the session small: choose one clear photo, run automatic removal, inspect the silhouette, undo any overreach, and make a few manual corrections. Then I would test the result against a plain color and decide whether it is good enough for the intended use. That sequence gives a beginner a real result without turning the first attempt into a long lesson in image editing.
If the first picture is a struggle, I would not take that as proof the app is unusable. I would switch to a photo with a simpler outline and stronger contrast, because the quality of the source image has a direct effect on how manageable the cutout feels. Once I have one clean success, I can try more demanding subjects with a better sense of what the automatic step handles well and where I need to slow down.
Choosing it for the right kind of work
For a quick personal graphic, a social image, or a straightforward subject cutout, this is a convenient place to start. I would keep it in mind when the main job is removing scenery rather than editing the whole photograph. The free price makes it approachable for trying that workflow, while the large user base and strong average rating make it a well-established option in mobile photography. I still judge each result on its own merits rather than assuming popularity means every edge will be perfect.
If I regularly create layered designs or need precise masking around intricate objects, I would compare it with a full-featured editor before settling on a workflow. Those tools can take longer to learn, but their wider controls may be worth it when an image must meet a demanding brief. For casual use, the simpler route is often more comfortable; for precision work, I would rather have more control than force a quick cutout tool to do a job it was not made to handle.
Final Thoughts
All in all, Background Eraser is a fantastic tool for anyone looking to spruce up their photos. Whether you're a social media enthusiast or just someone who enjoys a clean, polished picture, this app is a must-have. It’s intuitive, effective, and a lot of fun to use. Go ahead, give it a whirl, and watch your photo editing game level up!
Ready to try it out? Head over to your app store and see for yourself just how easy it is to transform your photos with Background Eraser. Happy editing!
Pros
- Easy to use with intuitive interface.
- Quick background removal process.
- Supports multiple image formats.
- Offers precise editing tools.
- Lightweight and fast app performance.
Cons
- Limited advanced editing features.
- Ads can be intrusive at times.
- Some tools lack precision.
- No batch processing option.
- Requires internet for full features.
FAQs for Background Eraser
What is Background Eraser and how does it work?
Background Eraser is an intuitive app designed to remove backgrounds from images with precision. Utilizing advanced AI technology, it identifies the foreground and seamlessly separates it from the background, allowing users to edit or replace it. The process is quick, requiring minimal user input, making it perfect for creating transparent images or designing unique photo compositions.
Is Background Eraser free to use?
Background Eraser offers a free version with basic features suitable for casual users. However, for those seeking enhanced capabilities, such as high-resolution exports and advanced editing tools, there is a premium version available through in-app purchases or subscriptions. This ensures flexibility for both amateur and professional users.
Can I use Background Eraser on both Android and iOS devices?
Yes, Background Eraser is available for download on both Android and iOS platforms. This cross-platform compatibility ensures that users can enjoy seamless editing experiences on their smartphones or tablets, regardless of the operating system, and access their projects across multiple devices.
What are the main features of Background Eraser?
Background Eraser boasts a variety of features including automatic and manual background removal, zooming and cropping tools, and the ability to save images in PNG format for transparency. The app also allows for easy background replacement, making it a versatile tool for creative projects, marketing materials, and personal photo editing.
Is Background Eraser suitable for professional use?
Absolutely. While the app is user-friendly enough for beginners, its advanced features cater to professional needs as well. High-resolution image processing, precise editing tools, and customizable settings make it ideal for graphic designers, marketers, and photographers looking to streamline their workflow and produce high-quality results.


